Curried Quinoa Stew

curriedquinoastew

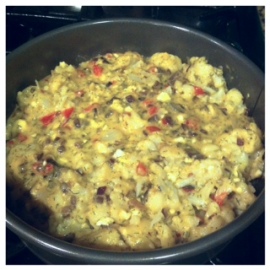
Quinoa is thriving in the new year. People, like myself, are enjoying the seed that offers vast amount of protein per carbohydrate. It can run close in comparison to the textures of couscous or pearl barley and works as a gluten free, nutritional powerhouse. The addition of quinoa to stews works perfectly because the seed grows and cooks in a liquid base. So, jumping on the quinoa bandwagon, the curried quinoa stew delivers on all notes.

curriedquinoastew2

Curry, is the generic English term primarily employed in Western culture to denote a wide variety of dishes whose origins are Southern and Southeastern Asian cuisines, as well as New World cuisines influenced by them such as Trinidadian, Mauritian or Fijian. In originaltraditional cuisines, the precise selection of spices for each dish is a matter of national or regional cultural tradition, religious practice and, to some extent, family preference. Curry powder, a commercially prepared mixture of spices, is largely a Western notion, dating to the 18th century. Such mixtures are commonly thought to have first been prepared by Indian merchants for sale to members of the British Colonial government and army returning to Britain. Curries may be either wet or dry. Wet curries contain significant amounts of sauce or gravy based on yogurt, coconut milk, legume purée (dal) or stock. Dry curries are cooked with very little liquid that is allowed to evaporate, leaving the other ingredients coated with the spice mixture. The main spices found in most South Asian curry powders are turmeric, coriander and cumin; a wide range of additional spices may be included depending on the geographic region.

Here are a few tips to keep in mind:

  1. I used baby carrots in place of chopping a large carrot.
  2. Using fresh ginger is essential in curry related meals. It adds depth and a more authentic taste to the dish.
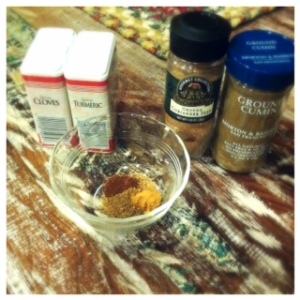
  3. I made my own curry powder. It is an equal mixture of turmeric, ground cumin, coriander and cayenne (optional).
  4. I used tomato sauce. I do not care for tomatoes and the sauce thickens the stew without leaving chunks.
  5. You can use vegetable broth for a vegetarian dish.
  6. I used white kidney beans in place of black beans. It was by random chance that I mixed the two cans up; however, I feel the kidney beans work better to balance the dish whereas black beans would overpower the flavors.
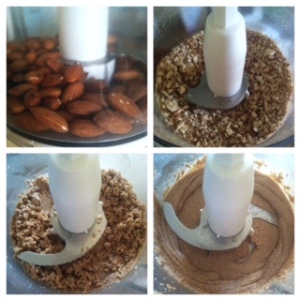
  7. The nut buttes add a depth of flavor to the dish and a creaminess to the soup. Also, it provides a hint of the end color.
  8. I nixed the cilantro because I do not care for the minty Mexican spice.
  9. Use a fair amount of spinach because it will wilt in the stew. Tearing it can be essential in dispersing the spinach evenly without spinach balls.
  10. I liked to cook my dish in my dutch oven. It works equally to a large pot, but the spices and flavors of curry will sink into the soul of your dutch oven: YUM!
  11. After adding the quinoa, stir the dish occasionally to keep it from burning. You will begin to notice that the stew becomes thicker as the quinoa absorbs the liquid while
    being tossed.
  12. Similar to the quinoa chili I have created in the past, you could substitute the carrots with sweet potatoes. Keep in mind that your nutritional information would then change as well since carrots are low in calories.

I have a knack for enjoying Indian dishes. Curry’s potent flavors and aroma are one of my favorite spices to work with. It can transform dishes into wonderful meals. I enjoy that curries and Indian dishes incorporate a vast amount of spices: meaning I can obtain flavor without calories. From the nuttiness of the peanut butter to the protein of the quinoa, my stomach was dancing after enjoying the meal. Eaten on a cold winter night or for an Indian flared party, the dish will wow friends and family alike.

Leave a comment with your favorite Indian recipes. Follow my Pinterest for more recipes. Check back again next Wednesday for more tips and tricks from The Cooking Bug.

Pumpkin Sage Polenta

pumpkinsagepolenta

The pumpkin saga continues with a pumpkin sage polenta.  I’m sure my pumpkin recipes outnumber a majority of my other recipes: obsessed much.  I love the soft, moist tenderness that pumpkin tends to add to these dishes.  Pumpkin fits nicely into polenta because it obtains a velvety texture when cooked.  The softness is complimented well with the powerful sage for a complete balance of flavors, texture and delicacy.

As it is known today, polenta derives from earlier forms of grain–puls or pulmentum, more commonly known as gruel or porridge–eaten since Roman times.  Polenta has a creamy texture due to the gelatinization of starch in the grain. However, it may not be completely homogeneous if a coarse grind or hard grain such as flint corn is used.  Historically, polenta is served as a peasant food in North America and Europe, but is considered upscale today.  Polenta is cooked by simmering in a water-based liquid combined with other ingredients.  It is often cooked in a huge copper pot known in Italian as a paiolo.  Polenta is known to be a native dish of and to have originated from Friuli.  Boiled and leftover polenta may be left to set, then baked or fried.

Here are some tips to keep in mind:

  1. Use legit polenta not the pre-made, pre-packaged gross polenta.  It has sodium and preservatives through the roof.
  2. I used homemade pumpkin puree; however, you can use canned pumpkin puree if
    need be.
  3. In place of water, you can use milk for a creamier polenta.  If using milk, nix the cheese
    in half.
  4. Limit the sage.  Sage is a powerful flavor profile, and you do not want to overpower
    the dish.
  5. The parmesan cheese softens the dish as a whole creating a deeper depth of flavor.
  6. You can use salted butter, but nix the salt otherwise.
  7. Be sure to continuously whisk the polenta after boiling to keep the polenta from burning and mix the ingredients.
  8. The polenta will begin to thicken once you begin stirring.
  9. Keep stirring!!!!  Polenta is a corn meal base that requires constant stirring in order to cook correctly.

This dish is the perfect holiday and special occasion meal.  Creamy and dreamy, the silky consistency and decadent aromas will melt in your mouth.  Whipping up the pumpkin sage polenta will add a dash of autumn to your plate.  It’s a sophisticated dish made easy.

Leave a comment with other pumpkin favorites.  Follow my Pinterest for more recipes.  Check back again next Wednesday for more tips and tricks from The Cooking Bug.

Almond Butter

almondbutter2

Everyone has always strayed from fats because society has brainwashed us into thinking they are big, bad and scary.  The truth of the matter is that a balanced diet includes fat; one just needs to balance the amount they eat daily.  Nuts are a great source of protein and fat.  When I want to splurge, I choose to eat a peanut butter, or in this case nut butter, sandwich.

I’ve been dying to make my own nut butters previously, but I had this terrifying thought that it was too hard.  Boy was I completely wrong.  All you need is a food processor and the nuts of your choice.  While most nut butters are made from peanuts and almonds, you can make them with any type of nut.  The essential part of making the nut butters is grinding the nuts until they release their oils creating the creamy texture.  Take note that nut butters tend to have a grimy texture unlike processed peanut butters and may need to be mixed before eating it to reincorporate the oils.

Here are some tips to keep in mind:

  1. I made half the amount of butter than the recipe; however, making more takes less time, funnily enough, because there is a higher volume of food being processed.  Ergo, you won’t have to stop 20 extra times to scrape the sides.almondbutter
  2. You can make as much or as little nut butter as you choose.  Be sure to keep it in an airtight container.
  3. Add any type of flavors to the nut butter: honey, white chocolate, dark chocolate, salt or chia.
  4. I suggest adding a pinch of salt to the butter or buying salted nuts from a whole grocers, like Sprouts.  Salt enhances flavors when cooking.
  5. Roast the nuts before processing them in a 350-degree oven for no more than ten minutes.
  6. Roasting the nuts brings out a nutty aroma, making your kitchen
    smell delicious.

Ta-Da! You’ve made your own, healthier and personalized, nut butter: simple and easy without those pesky preservatives.  Make as little or as much of the nut butter as you’d like for less than grocery store prices.  Individualize the butters with your favorite flavors to build new creations.

Leave a comment with your favorite nutty flavors.  Follow my Pinterest for more recipes.  Check back again next Wednesday for more tips and tricks from The Cooking Bug.

Cauliflower Mash with Brussels Sprouts and Bacon

cauliflowerbrusselsprouts

A daily diet should consist of 2-3 servings of vegetables.  This cauliflower mash with brussels sprouts and bacon helps achieve that goal.  Because cauliflower is so versatile in texture and flavor, it works well as any base.  Cauliflower can substitute rice, pizza crust and now mashed potatoes while still maintaining complex flavors.  It allows for you to enjoy all those starchy meals with a healthier alternative.

Here are some tips to keep in mind:

  1. This recipe makes two appropriate portion sizes, so if you’re someone who is making this for a large meal you’ll need to double or triple it.
  2. Take as much of the stem off the cauliflower as possible.
  3. I placed my cauliflower in a microwave safe bowl to microwave for 6 minutes instead of cooking it stovetop.
  4. I used turkey bacon because it still has the flavor without all the sodium and
    saturated fats.
  5. The bacon can be cooked in about 4 minutes stovetop.cauliflowerbrusslesprouts2
  6. Food process the cooked cauliflower to a
    puree consistency.
  7. Adding olive oil to the cauliflower creates flavor and a smoother consistency.
  8. The puree should mock the look of
    mashed potatoes.
  9. The nutmeg adds a depth of flavor to the dish.
  10. I cooked the brussels sprouts in the oven because I think they crisp better. Cook them with some pam for about 40 minutes flipping halfway through.
  11. I nixed the chickpeas because it is already a carb heavy meal; luckily, your carbohydrates are coming from vegetables.
  12. Use tofurky for vegan and vegetarian options.

Vegetarians and food fanatics alike will dive into this dish.  The combinations of ingredients all compliment one another creating a deep, palate profile.  It’s a quick and easy way to enjoy vegetables; it’s a quick and easy way to enjoy a meal without bursting your waistline; it’s a quick and easy way to enjoy a burst of delectable flavors.

Leave a comment with your favorite cauliflower recipes.  Follow my Pinterest.  Check back again next Wednesday for more tips and trick from The Cooking Bug.

Cauliflower Cake

cauliflowercake

You may think I’m crazy. Cauliflower and cake in the same sentence seems like an alien recipe–with out-of-this-world flavor! I’ve gone crazy with cauliflower in the past. From cauliflower used as a pizza crust to rice, I have learned the versatility of vegetables. Now, this cauliflower cake falls into the frittata family and packed with a combination of savory flavors.

Cauliflower has 16 percent less carbs and 79 percent fewer calories per half cup serving than potatoes and other starches. Thanks to the abundance of pectin–the stuff that thickens jams and jellies–pureed cooked cauliflower has a velvety texture that adds body to soups, mimics potatoes in a mash or tots and can even form cakes and crusts. Its versatility lends a helping hand to a variety of meals.

Here are some tips to keep in mind:

  1. I kept my florets larger, but I suggest making them the size of a bottle
    cap–personal preferences.cauliflowercake3
  2. Use Pam in place of the olive oil if you have consumed your fats for the day.
  3. Caraway seed pairs nicely with the dill. It resembles fennel seed.
  4. Garbanzo bean flour or another gluten free flour can be used. It will be found in the natural food section of most markets and will need to be refrigerated in an air tight container after being opened.
  5. The mix of eggs and cheese help create cohesion between ingredients; the flours create the cake like consistency although the entire dish resembles a frittata.
  6. I used a fresh red pepper charred stovetop. You can also broil the pepper being sure to turn it charring all sides.
  7. I usually prefer to nix dill from recipes, but it is a necessity in balancing the savory aspects of the dish.
  8. I used Pam along the inside of the springform pan rather than parchment paper.

cauliflowercake2
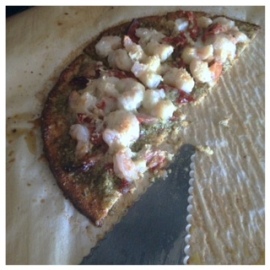
I’ve learned to not judge a recipe by its name. It may sound crazy, but the crazy recipes are the ones that make your taste buds sing. Cauliflower’s timid flavors pair well in various forms. From pizza to cakes, there’s a recipe to expose your family to vegetables in a healthy and flavorful way. Trust me, like the favored cauliflower pizza, you will be begging for more of this bizarre meal.

Leave a comment with your favorite frittata recipes. Follow my Pinterest for more recipes. Check back again next Wednesday for more tips and tricks from The Cooking Bug.

Best of 2013

To ring in the New Year, I’m going to count down the top 10 recipes that you, the readers, enjoyed most. Go ahead and take time to check them out. You won’t be disappointed.  Ring in the New Year with a new recipe!

Here we go! The top 10 recipes are:

  1. Cauliflower Pizza
  2. Honey Roasted Chickpeas
  3. Pumpkin Pie
  4. Pumpkin Chocolate Chip Muffins
  5. Pesto, Shrimp and Tomato Cauliflower Pizza
  6. Pumpkin Pie Spiced Popcorn with White Chocolate Drizzle
  7. Pumpkin Pecan Butter
  8. Rosemary Cornish Hens
  9. Oreo Truffles
  10. Gnocchi

Be sure to check out the above links to find you new year recipes.  My approach to making recipes even healthier will keep your New Year’s resolution in check.  Now, make a new resolution to check out these recipes and more to come. It looks like 2014 is going to be
pretty delicious.

Leave a message with your thoughts about my top ten. Follow my Pinterest for more recipes. Check back again next Wednesday for more tips and tricks from The Cooking Bug.

Gingerbread Brownies

gingerbreadbrownies

Now that Thanksgiving is done and over, we’re moving on to other delicious holiday treats.  Gingerbread is one of the many iconic holiday treats when snow begins to coat the ground.  From cookies, cakes and even coffee, we find gingerbread’s spice-laced flavor a holiday extravaganza.  These gingerbread brownies do not disappoint, but keep that in mind: they are hard to keep out of your hands.

Gingerbread is a versatile ingredient.  It can be incorporate into moist cakes or dense cookies.  Gingerbread is fragrantly flavored from ginger and sweetened with molasses or honey.  It posses a versatile spiciness from the ginger making the dishes a sweet and savory treat.  We see it most commonly used in cookies to form little men­–gingerbread men and women.  Today, gingerbread is used in coffee creamers, cakes, breads, icing, hot chocolate and other desserts.  The spiciness makes my taste buds come back for more.

Here are some tips to keep in mind:

  1. I used gingerbread cookies in place of the cake mix.
  2. DO NOT use the ingredients listed on the box keep to the recipe linked above.
  3. The powdered sugar adds a snow like quality to the brownies.  I added the powdered sugar because it’s necessary for that holiday feeling.gingerbreadbrownies2
  4. You can substitute the cake or cookie mix for a gingerbread recipe passed down from your family; however, you will want to use the dry ingredients only.
  5. The dough will be a little sticky and should have a firmer texture than normal brownies.
  6. I cooked mine for about 20 minutes.  They were the perfect consistency of ooey,
    gooey deliciousness.
  7. The longer the brownies set the firmer they will become.  They should be eaten within a few days of baking.
  8. I like to bake my brownies in one big pan rather than using individual slats because it keeps the edges gooey.  The centerpiece is the best!

By the end of this baking adventure, you will have a simple and delicious holiday brownie.  Gingerbread brownies work well as treats for neighbors or holiday parties.  Within 25 minutes, you have a unique treat that will be gobbled up in minutes.  They can be made with only three ingredients and little time.  The recipe is an easy cheat with professional results for those of us with little time or little experience baking goods.

Leave a comment with your favorite gingerbread treats.  Follow my Pinterest for more recipes.  Check back again next Wednesday for more tips and tricks from The Cooking Bug.

Pumpkin Pie

pumpkinpie

Pumpkin pie is a glorious tradition for every Thanksgiving.  It is a great fall treat that I look forward to annually.  I may be boring when it comes to desserts, but this perfect pumpkin pie is a delicious treat you won’t be able to put down.  On Thanksgiving or any special holiday, pumpkin pie always has a prime spot on my plate.  I am a fanatic for pumpkin.  It’s moist; it has a touch of spice; it creates a smooth texture.

This perfect pumpkin pie is the first pumpkin pie that has yet to split after setting.  It stayed smooth along the top and moist on the inside.  If you have not made pumpkin pie with homemade pumpkin puree, I highly suggest giving it a try.  It creates a huge difference in flavor and texture.

Here are some tips to keep in mind:

  1. I used homemade pumpkin puree.
  2. You can make your own pie crust or use a premade one like Pillsbury.
  3. If you are using pumpkin pie filling, this recipe is not for you because the can has done all the work. Cheater!!!
  4. THIS IS A DESSERT FOR THE HOLIDAYS!!!! DO NOT SKIMP ON SUGAR! If you are really worried about the sugar amount, use stevia and truvia.  But, know that the flavor won’t be the same.
  5. I’m a pumpkin pie snob, and I fell in deep love with this recipe!
  6. The pie can be made the night before and left to set for the following evening.
  7. Let the pie set uncovered away from the stove.
  8. Using fresh pumpkin puree keeps the pie from splitting because it is moister than
    canned pumpkin.
  9. Use foil around the edges of the pie crust until the last ten minutes of cooking to keep the edges from burning.
  10. The pie must be eaten with Cool Whip! OH YA!

Pumpkin pie–enough said.  This recipe cannot get any better other than making your own pie crust.  Keep on stuffing yourself with pumpkin while I work on making another batch!

Leave a comment with your favorite holiday pies.  Follow my Pinterest for more recipes.  Check back again next Wednesday for more tips and tricks from The Cooking Bug.

Pumpkin Spiced Snicker Doodles

pumpkinsnickerdoodles2Cookies made healthy is a hard thing to imagine, but SkinnyTaste does it again with these sugary babies.  Snickerdoodles are my favorite cookie, but adding a pumpkin flavor is making them top shelf cookie: pumpkin spiced snickerdoodles The whole-wheat flour makes them lighter than regular cookies without sacrificing flavor.

Here are some tips to keep in mind:

  1. The recipe makes 42 bite sized cookies or 21 regular sized cookies.  Just keep in mind to adjust times for making larger cookies.
  2. Be sure to use softened butter to make a dough rather than a short bread based cookie.
  3. You can use cream of tartar and baking soda or substitute both with baking powder based on which you have on hand.
  4. Using whole-wheat flour makes the cookies healthier than using all purpose, but both will work in the recipe.
  5. I used Truvia.  With truvia, you can use half the amount of sugar because it is twice as sweet as regular sugar.
  6. The dough should be easily formed into small balls by compacting it.  If it is too sticky, you need to add more flour.snickerdoodlepumpkin
    7.  Roll the dough evenly in the sugar to create that snicker doodle look and flavor.
    8.  I used parchment paper sprayed with pam instead of a mat.  You just don’t want it on the cookie sheet because the bottoms will burn
    and stick.
    9.  Press them down with a fork so that they cook evenly and form a cookie shape.
    10.  Since they are so small they only take ½ the time (about 5-7 minutes).  Keep that in mind so they don’t burn.

Again, I made these for friends and they had a hard time keeping their paws off.  Fall in season and pumpkins everywhere they are a great fall and Halloween treat.  The bite-sized pieces make them the perfect amount of sugar to keep you satisfied without bulging that waistline.

Leave a comment with your favorite pumpkin ideas.  Follow my Pinterest for more recipes.  Be sure to check back again next Wednesday for more tips and tricks from The Cooking Bug.

Pesto, Shrimp and Tomato Cauliflower Pizza

pestoshrimpcaulipizza4

If you haven’t switched to cauliflower pizza crust, then stop and read this blog! <–

Now, that you’ve decided that cauliflower pizza is delicious and nutritious, we can begin.  We’re taking that “normal” cheese pizza to a whole new level.  I got the inspiration to make this pesto, shrimp and tomato cauliflower pizza after having made the pesto sauce and falling in love.  I replaced the tomato sauce of regular pizza with pesto and topped it with shrimp, sun-dried tomato and a Fontina-Gruyere cheese mixture.

Together these ingredients make the perfect piece of pizza without the unhealthy grease and delivery prices. One pizza or head of cauliflower will make four servings at around 400 calories.  You can cut the pieces in half for 200 calories for a wine and pizza night or
football appetizer.

Here are some tips to keep in mind:

  1. Unlike the first time I made the cauliflower crust, I cooked it for about 20-25 minutes the first round.  The longer it bakes the sturdier and crispier the crust will be.
  2. I spread the pesto (about 4 tbsp) evenly along the crust leaving a 1/2 inch gap along
    the edges.
  3. I then added diced shrimp (fresh or frozen) and sun-dried tomatoes.  You can add as much or as little of these ingredients as needed.
  4. I used a 1/2 cup of cheese as with any pizza is traditional.  You can mix and match the cheese to your liking.  I would suggest keeping away from the Parmesan types of cheeses because those flavors are already incorporated into the crust.
  5. Cook the pizza for an additional 8-10 minutes until the cheese is melted and golden.
  6. Don’t freak out when you see the olive oil from the pesto dripping off the sides.  It will help crisp the crust and disperse flavor.

pestoshrimpcaulipizza3

Allow your guest to melt under the flavors bursting out of the pizza.  They’ll be surprised to hear the crust is cauliflower.  You’ll be the chef of the century and win recipe of the year awards for the pizza party delight.

There are a lot of links so be sure to check them all out above.  Leave a comment with how the pizza went over in your household.  Follow my Pinterest for more delicious recipes.  Check back next Wednesday for more tips and tricks from The Cooking Bug.