Teriyaki Chicken Wings

TeriyakiChickenWings

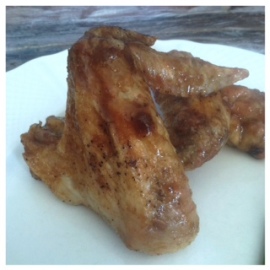
Added advantage of being on a paleo diet is that I can gorge on these delicious teriyaki chicken wings. Unlike diets with heavy carbohydrates, the paleo diet is heavy in protein and fats allowing me to enjoy in the skin and all. These wings deliver on all notes. The sauce combines sweet and salty tangs with a meaty juiciness.

Teriyaki is a cooking technique used in Japanese cuisine in which foods are broiled or grilled with a glaze of soy sauce, mirin and sugar. The word teriyaki derives from the noun teri–the shine or luster given by the sugar content in the tare–and yaki–the cooking method of grilling or broiling. Traditionally, the meat is dipped in or brushed with sauce several times during cooking. In North America, any dish made with a teriyaki-like sauce or with added ingredients such as sesame or garlic (uncommon in traditional Japanese cuisine), is described as teriyaki. Pineapple juice is usually used as it not only provides sweetness but also bromelain enzymes that help tenderize the meat.

Here are some tips to keep in mind:

  1. I used chicken wings. They combine both the drumettes and wings into one; however, using just wings or just drumettes is optional.
  2. I used coconut aminos for a paleo version. Using soy sauce will provide the same flavor, but it is not gluten free.
  3. I used honey for my sweetener. I think it is not overly sweet and works well as a thickening agent for a sauce.
  4. TeriyakiChickenWings2Careful using fresh ginger because it will cause chunks in the sauce that can be potent.
  5. Broiling works well in browning the outside skin without overcooking the meat inside.
  6. Cooking the wings skin side down for the first ten minutes, allows the meat to cook through without burning the skin.
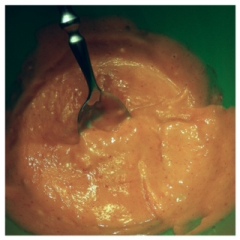
  7. The sauce is easy! Mix all the ingredients until the desired thickness.
  8. The sauce will continue to thicken and cook after being removed from the heat, so I suggest not boiling it over seven minutes.
  9. Toss the wings evenly to coat the
    wings evenly.

Napkins will be your best friends with this meal. It is finger licking good, but on the sticky side. I could have continued to eat the entire batch myself. Keep that in mind and be sure to double or triple the meal, inviting friends and family to come and enjoy the dish. It is a quick and easy meal for reunions and parties. Have everyone over to enjoy some wings and wow them with the sweet and salty crunch of these meaty wings.

Leave a comment with your favorite wing sauce. Follow my Pinterest. Check back again next Wednesday for more tips and tricks from The Cooking Bug.

Roti–Indian Flatbread

I love bread! It is a horrible and honest answer, but since I was a child I have enjoyed bread of any kind. I was excited to have found a recipe for what I had thought was naan. However, I was surprisingly excited to understand the differences between naan and what I found to have made, roti. The following describes the subtle differences:

Naan or Nan is a leavened, oven-baked flatbread. It is popular in West, Central and South Asia. In Iran, from which the word ultimately originated, nān does not carry any special significance, as it is merely the everyday word for any kind of bread. Naan in other parts of South Asia usually refers to a specific kind of thick flatbread. Generally, it resembles pita and, like pita bread, is usually leavened with yeast or with bread starter. Naan is cooked in a tandoor, from which tandoori cooking takes its name. This distinguishes it from roti, which is usually cooked on a flat or slightly concave iron griddle called a tava. Typically, it will be served hot and brushed with ghee or butter. It can be used to scoop other foods, or served stuffed with
a filling.

roitindianflatbread

Roti is generally an Indian bread, made from stoneground wholemeal flour, traditionally known as atta flour, that originated and is consumed in India, Pakistan, Nepal, Sri Lanka and Bangladesh. It is also consumed in parts of South Africa, the southern Caribbean–particularly in Trinidad and Tobago–Guyana and Fiji. Its defining characteristic is that it is unleavened. Indian naan bread, by contrast, is a yeast-leavened bread. Roti and its thinner variant, known as chapati, are integral to Indian and Pakistani cuisine

Here are a few tips to keep in mind:

  1. I used whole-wheat flour.
  2. I used more than the amount of water suggested.
  3. You want to create dough that is firm but a cohesive piece.
  4. I mixed the dough in my Kitchen Aide mixer, then I kneaded it to incorporate the missed flour and lost pieces.
  5. I was able to divide my dough into nine balls, probably 12 had I made them evenly sized.
  6. Be sure to roll them thinly. Thicker pieces will leave a doughy texture when cooked.
  7. After rolling them, place them on a cookie sheet layering them with paper towels to keep them from sticking.
  8. Be sure to not over flour them because the flour residue will stick to the naan during the cooking process and be left afterwards. No one likes raw flour.
  9. Heat the skillet, without oil or Pam, on high.rotiindianflatbread2
  10. The dough will begin to bubble with air pockets within 30 seconds. Flip the bread immediately to reduce the chance of burning the bread and cook for an additional 30 seconds.
  11. The tops of the naan will be freckled with brown cook spots.
  12. Oil only the top of the naan. Because the bread is thin, the oil will be absorbed on both sides.

Understanding my love for Indian dishes, I am thrilled to understand both the difference between naan and roti and having found a recipe that allow for a traditional bread to accompany my future exotic dishes. Paired with a curried quinoa stew or as a side to a tikka masala, the roti is simple and easy to make. You can even add peanut butter and enjoy as is, like my mother. Hurry though because with friends and family there might not be any left
for you.

Leave a comment with your favorite Indian recipes. Follow my Pinterest for more recipes. Check back again next Wednesday for more tips and tricks from The Cooking Bug.

Zoodles

Zoodles2Is it a poodle? Is it a noodle? It’s zucchini noodles!!!!! Or as many like to call them the famous zoodles—perfect for low carb or Paleolithic diets. These surprisingly tasty substitutes for noodles are quicker to cook and full of beneficial nutritional treats. From boring and bland to pizzazz and pop, zoodles add both flavor and color to any dish.

Zucchini provides only 17 calories per 100 g. It contains no saturated fats or cholesterol. The peel is good source of dietary fiber that helps reduce constipation and offers some protection against colon cancers. Zucchinis can be available all around the year, but they are at their best during late spring and summer seasons. In the stores, choose small to medium-sized zucchini featuring shiny, bright green skin, firm and heavy in hand. The best size for zucchini is 6 to 8 inches length and 2 inches or less in diameter. Some big sized varieties with marrow are specially grown for stuffing. Minor superficial scratches and mild bruises oftentimes seen on their surface are perfectly fine. Avoid overly mature, large zucchini with pitted skin, and those with flabby or spongy textured. Furthermore, avoid those with soft and wrinkled ends as they indicate old stock.

Zoodles3

Here are some helpful tips to keep in mind:

  1. For this recipe, use fresher zucchini. Zucchini that has been sitting around becomes too watery and is hard to spiral/peel.
  2. You can use different tools to create zoodles: a sprialer or a ribbed peeler. I used a ribbed peeler.
  3. You can peel the skin off the zucchini, but my preference is to keep it on. It creates a nice contrasting light and dark green of color to the dish.
  4. Sauté the zucchini in a heated pan of olive oil or coconut oil. Start out with less oil than you think you’ll need because you can always add more in.
  5. Toss the zucchini a couple of times while cooking to keep it from burning and cooking through evenly.

Zoodles
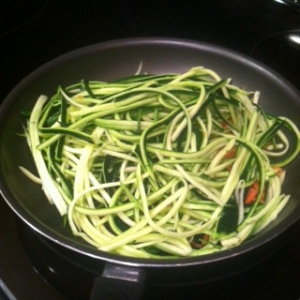
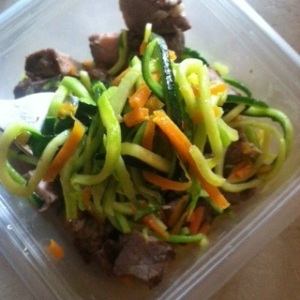
Zoodles trending popularity comes with the new wave of low carb dietary restrictions and healthier substitutions. Unlike heavy pastas, zoodles offer a low calorie, zero carb vegetable to your plate. Cooked properly, the zucchini turns a vibrant green that makes my heart melt and my mouth water. I love using fresh zucchini from the farmers market because the zucchini tends to be in better form. Whatever your reason, zoodles are a great way to enjoy vegetables and mix up your diet.

Leave a comment with your favorite zoodle addition: meat, sauce, pesto or more the options are endless. Follow my Pinterest for more recipes to try. Check back again next Wednesday for more tips and tricks from The Cooking Bug.

Sushi Trifle

sushitriffle

Deconstructed sushi! I love enjoying sushi at restaurants; however, rolling sushi can be time consuming and takes technique. The sushi trifle satisfies taste without the inconvenience of rolling. It can be plated to impress or mixed for ultimate enjoyment. Mix and match various flavors and ingredients to match sushi at
famous restaurants.

Sushi is a $14 billion industry in Japan. There are types of sushi to fit every taste–vegetables, raw fish, cooked fish and meat are common ingredients. The original type of sushi, known today as nare-zushi, was first made in Southeast Asia, possibly along what is now known as the Mekong River. The term sushi comes from an archaic grammatical form no longer used in other contexts. Literally, sushi means “sour-tasting”, a reflection of its historic fermented roots. The oldest form of sushi in Japan, narezushi, still very closely resembles this process, wherein fish is fermented via being wrapped in soured fermenting rice. The fish proteins break down via fermentation into their constituent amino acids. The fermenting rice and fish results in a sour taste and one of the five basic tastes, called umami in Japanese.

Here are some tips to keep in mind:

  1. I replaced the sushi rice with white rice. Brown and sticky rice work as replacements.
  2. The crumbled nori provides the full sushi roll flavor. It is salty and tastes best when slightly softened.
  3. I nixed the wasabi sauce because I prefer my food non-spicy.
  4. You can stack the ingredients in any fashion. For formal meals and fancy plating, use a clear wine glass and stack the ingredients in layers as seen.
  5. In the future, I suggest mixing the ingredients in a bowl to have all the flavors in
    each bite.
  6. Be sure to cook the salmon unless the sushi deconstruction is calling for raw meat. Be advised as to meats that can be eaten raw and those that need to be cooked.

Sushi has a long history throughout Asia. Methods have changed and contemporized allowing for variety and maximum flavor. While tackling sushi rolls may be challenging, sushi trifles complete flavor and ease. Mix and match favorite sushi rolls to triumph.

Leave a comment with your favorite Asian dishes. Follow my Pinterest. Check back again next Wednesday for more tips and tricks from The Cooking Bug.

Beef Enchilada

beefenchilada2

Is Spanish food calling your name?  Beef enchiladas hit the nail on the head putting those Spanish cravings to rest.  I love that this recipe is simple and manageable to any skill level.  It allows for flavor without busting the budget.  Also, the author provides a detailed listing of substitutions and nutritional information to keep track of those pesky calories.  Simple and tasty, these enchiladas open a whole new world into making low calorie meals delicious.

Enchiladas are corn tortillas rolled in a filling and covered in a salsa or chili sauce.  The filling can be mixed from a variety of beans, cheese, meat and seafood.  Enchiladas originated in Mexico, where the practice of rolling tortillas around other food dates back at least to Mayan times.  The people living in the lake region of the Valley of Mexico traditionally ate corn tortillas folded or rolled around small fish.  There are now many varieties, which are distinguished primarily by their sauces, fillings and, in one instance, by their form.  Various adjectives may be used to describe the recipe content or origin.

Here are some tips to keep in mind:

  1. I suggest doubling the recipe because ground beef is packaged in one pound increments.  I was able to make 16 enchiladas.
  2. I used the six-inch yellow and corn tortillas.  You can use larger tortillas and just make less enchilada.
  3. I enjoyed the yellow corn tortillas more because they were a thicker tortilla.
  4. I used yellow and orange peppers.  These peppers add sweetness to any dish.
  5. You can use any type of cheese.  I suggest a sharp cheddar or three cheese Mexican mix.
  6. I sprinkled the cheese on top of the completed enchiladas before placing them in theoven.
  7. I used two cans of salsa, one picante and one organic, mild salsa.
  8. I nixed the cilantro because I do not like the minty flavor.
  9. I cooked my enchiladas in the oven for only 15 minutes.  You just need to cook the tortillas and melt the cheese on top.

beefenchilada
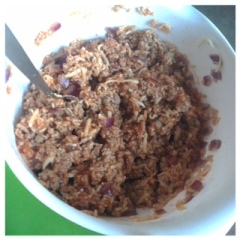
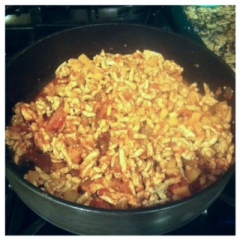
Ven a probar esta receta!  While most Spanish food is a great balance of nutrient rich tomatoes and ingredients, they can be high in calories.  However, these beef enchiladas are only 330 calories per serving.  You can lessen the carbohydrate intake by using a one semi-larger tortilla and more filling.  Try a variety of fillings and combinations to satisfy your family’s growling stomach.  With only a few ingredients and 20 minutes, you create a Spanish fiesta.


Leave a message with your favorite enchilada sauce and filling.  Follow my Pinterest for more recipes.  Check back again next Wednesday for more tips and tricks from The Cooking Bug.

Stuffed Peppers

stuffedpeppers2

I love my mom’s stuffed peppers, so this recipe is all “cootoes” to her.  It’s an easy dinner recipe that allows for multitasking on those busy nights or keeping frozen for that day you just need a taste of home.  The recipe hits the nail on the head in all the food groups–carbs, proteins, veggies and fat.  Making the peppers during your famer’s market’s peak allows for the full flavors of the vegetables to stand out.  Enjoy a delicious, comfort meal that your family and friends will love.

You’ll need:

4 Green peppers
1 Package of Jennie O Lean Ground Turkey
Onion (I usually use ½ an onion)
2-16 oz Cans of Tomato Soup
4oz (or less) Low Fat Mozzarella Cheese
Minute Brown Rice (I usually use 1 cup)

The Process:

Step 1: Clean out the peppers.
stuffedpeppersStep 2: Cook the ground turkey and onions stovetop.
Step 3: Combine the turkey mixture in a bowl with the uncooked rice.  Add ½ can of soup and cheese.
Step 4: Stuff the peppers with the mixture.
Step 5: Place the peppers in a microwave bowl with the remaining soup (the peppers should sit in at least half a bath of soup) and sprinkle cheese on top.
Step 6: Microwave on 50% power for 25-30 minutes.  The outside of the pepper should be soft.

The Tips:

  1. Be sure to clean out all of the seeds from the peppers, but only cut the tops off.
  2. Keep the rice uncooked because it will cook in the juices while being microwaved.
  3. Be sure to use tomato soup.  I tried the recipe with tomato sauce once and it was too powerful and overwhelming with a thick consistency.
  4. Be sure to have a big enough cookware that keeps the sauce from spilling over while in the microwave.
  5. Cover the peppers before adding to the microwave with cling wrap, or you’ll have one messy microwave afterwards.

This recipe is my comfort of home in a pepper.  It is simple and easy to make with a flavorful, nutritious meal.  “Cootoes” to my mother for making such a tasty meal microwaveable.

Leave a comment with meals inspired from your mom.  Follow my Pinterest for more recipes.  Check back again next Wednesday for more tips and tricks from The Cooking Bug.

Rosemary Roasted Brussels Sprouts and Apples

rosemaryroastedbrussles&apples2

I love Brussels sprouts.  They can be eaten a various ways making them a great mix in salads and other dishes like rosemary roasted Brussels sprouts and apples.  The added nutrients of hemp seeds create a protein bonus–great for vegetarians and vegans.  While hemp seeds and Brussels sprouts have a bad reputation, the mix created here can help change those horrible statuses.  They provide a satisfying delight that will leave you full of green love.

Brussels sprouts are a great vegetable to add to your diet.  Like all green vegetables, you can eat as many as you’d like.  The Brussels sprout is a cruciferous vegetable related to the cabbage.  Removing the outer leaves reveals a compact, leafy vegetable that provides beneficial nutrients in each sweet and nutty layer.  Sauté Brussels sprouts to caramelize and enhance the sweet side or steam for a more direct approach.  Veggies may not top your list of protein foods, but a 3.5-oz. serving of Brussels sprouts provides 3.4 g of protein or 7 percent of the Institute of Medicine’s minimum daily recommendation for women.  Protein is important for rebuilding damaged skin tissue and producing enzymes that transform food to energy.

Here are some tips to keep in mind:

  1. The recipe makes about 8-10 servings; ergo, I suggest halving the recipe.
  2. Fugi apples should be used because they are tart and sweet.
  3. I used twice the amount of olive oil.  Make sure to coat the apples and Brussels sprouts; the olive oil helps them brown and cook.
  4. Hemp seeds are a great crunch to the dish.
  5. It took about 35-40 minutes to brown the Brussels sprouts.  I suggest browning them 25 minutes before adding the hemp seeds to prevent burning.
  6. Be sure to flip the sprouts and apples halfway through.
  7. I like to cook my Brussels sprouts a little longer to rid them of their natural
    cabbage flavor.
  8. If you are conscious of the amount of oil you use, like myself, I suggest spraying the Brussels sprouts with pam in place of olive oil.

rosemaryroastedbrussles&applesHemp seeds come from a plant that is similar to the marijuana plant, but has lower levels of psychoactive cannabinoid compounds.  Hemp seed extract has an unidentified compound in it that may help to promote learning, memory and immune function.  It may stimulate the brain enzyme known as calcineurin, according to the University of Michigan.  Calcineurin plays an essential role in some brain synapse activities.  Hemp seeds are rich in essential fatty acids.  The oil in the seeds is a source of the omega-3 fatty acid.  Omega-3 fatty acids reduce inflammation in your body.  They also may lower risk for cancer, heart disease and arthritis.  Hemp seeds can help you if you are constipated because they act as a
bulk-forming laxative.

I love the crunch that the hemp seeds provide; I love the sweet tartness of the Fugi apples; I love the depth of flavor all the herbs create.  All in all this recipe will convert anyone into becoming a Brussels sprout lover.  This dish works well as an introductory dish to young children and adults alike to expand their palates with nutritious vegetables.

Leave a comment with your favorite side dishes.  Follow my Pinterest for more recipes.  Check back again next Wednesday for more tips and tricks from The Cooking Bug.

Broccolini Chicken Pizza

brocollinipizza

It was not until recently that I became obsessed with adding greens onto my pizza. I grew up with pizza consisting of cheese, pepperoni and sauce–no deterring from the norm. However, greens add a nutritional note to your dishes without unnecessary calories and pair well with a variety of ingredients. For instance, broccolini chicken pizza is a sweet and savory combination. The sweet, citrus ricotta paired with the vibrant greens and mouthwatering chicken brings heavenly flavors to my tummy. The recipe shows me that greens and creativity bring delicious meals to the table.

Broccolini is a green vegetable similar to broccoli but with smaller florets and longer, thinner stalks. It is a hybrid of broccoli and kai-lan, Chinese broccoli, developed by the Sakata Seed Company of Yokohama, Japan. Broccolini is also known as asparation, asparations, bimi, broccoletti, broccolette and tenderstem. The entire vegetable is consumable, including theoccasional yellow flower. Common cooking methods include sauteeing, steaming, boiling and stir-frying. Its flavor is sweet, with notes of both broccoli and asparagus, although it is not closely related to the latter. Nutritionally, it is high in vitamin C and contains vitamin A, calcium and iron.

Here are some tips to keep in mind:

  1. I used broccolini. It is one of my favorite vegetables, but it can be hard to find in grocery stores. Take advantage while you can!
  2. I nixed the lemon zest because I had bottled lemon juice only. The zest helps the acidity and adds a fresh note to the pizza.
  3. I used a pre-made crust and adjusted the cooking times; however, soon after I found out that Trader Joe’s has whole-wheat pizza dough. (Shout out to Charlie Mai for letting me know it existed!)brocollinipizza2
  4. I suggest nixing the oil in half. I felt the oiled pizza crust made it soggy and was unnecessary fat in your diet. Save those calories for something you really want–like dessert…heehee.
  5. Ricotta is thick and grainy. Mixing it with lemon juice helps soften the cheese, and it becomes similar in texture to pesto.
  6. I cleaned my chicken breast of the fatty deposits and chopped them evenly. You need the pieces small enough to cook through without overcooking your broccolini.
  7. Pile the toppings onto the crust; I had enough topping to make two pizzas.
  8. Baking the pizza with the toppings facilitates the process of creating an adhesion between ingredients and melting the ricotta.
  9. I suggest cooking the chicken until just about done on the stovetop. This method will allow the chicken to continue cooking while preparing the pizza and again in the oven without overcooking it creating a dry, juiceless texture.

The topping alone contains vast amounts of flavor. Adding those flavors to the top of a delicious bread and we have a winner. The pizza adds a variety to your daily routine. You can still enjoy the normalcy of pizza with a twist. Incorporating broccolini onto circular bread is a great way to trick little ones, or yourself, into eating their greens.

Leave a comment with your favorite pizza recipes. Follow my Pinterest for more recipes. Check back again next Wednesday for more tips and tricks from The Cooking Bug.

Cauliflower Mash with Brussels Sprouts and Bacon

cauliflowerbrusselsprouts

A daily diet should consist of 2-3 servings of vegetables.  This cauliflower mash with brussels sprouts and bacon helps achieve that goal.  Because cauliflower is so versatile in texture and flavor, it works well as any base.  Cauliflower can substitute rice, pizza crust and now mashed potatoes while still maintaining complex flavors.  It allows for you to enjoy all those starchy meals with a healthier alternative.

Here are some tips to keep in mind:

  1. This recipe makes two appropriate portion sizes, so if you’re someone who is making this for a large meal you’ll need to double or triple it.
  2. Take as much of the stem off the cauliflower as possible.
  3. I placed my cauliflower in a microwave safe bowl to microwave for 6 minutes instead of cooking it stovetop.
  4. I used turkey bacon because it still has the flavor without all the sodium and
    saturated fats.
  5. The bacon can be cooked in about 4 minutes stovetop.cauliflowerbrusslesprouts2
  6. Food process the cooked cauliflower to a
    puree consistency.
  7. Adding olive oil to the cauliflower creates flavor and a smoother consistency.
  8. The puree should mock the look of
    mashed potatoes.
  9. The nutmeg adds a depth of flavor to the dish.
  10. I cooked the brussels sprouts in the oven because I think they crisp better. Cook them with some pam for about 40 minutes flipping halfway through.
  11. I nixed the chickpeas because it is already a carb heavy meal; luckily, your carbohydrates are coming from vegetables.
  12. Use tofurky for vegan and vegetarian options.

Vegetarians and food fanatics alike will dive into this dish.  The combinations of ingredients all compliment one another creating a deep, palate profile.  It’s a quick and easy way to enjoy vegetables; it’s a quick and easy way to enjoy a meal without bursting your waistline; it’s a quick and easy way to enjoy a burst of delectable flavors.

Leave a comment with your favorite cauliflower recipes.  Follow my Pinterest.  Check back again next Wednesday for more tips and trick from The Cooking Bug.

Teriyaki Salmon with Sriracha Cream Sauce

teriyakisalmonwsrirachacream2

Sound fishy? We’ve divulged in fish Fridays every week. It can be challenging to mix up your fishy flavors. Teriyaki salmon with sriracha cream sauce elevates your fish in 30 minutes cooking time. Place atop rice and you have a wonderful dish that can compete with sushi restaurants worldwide. I love the complimentary sweet and spicy sparks that sizzles in my mouth with every bite. I don’t usually care for mayonnaise or spice, but this recipe changed my mind. Combined, they create a cooling sensation to the fire of sriracha.

Here are some tips to keep in mind:

  1. Allow the fish to marinade and collect flavors.
  2. In place of mayonnaise, you could use a greek yogurt. It is a healthier substitute that maintains a cooling sensation.
  3. Sriracha is a widely used hot sauce in many Asian dishes and can be found most commonly in ethnic food sections.
  4. The sweetened condensed milk is foul on its own; it is used to create the creamy thickness of a sauce.teriyakisalmonwsrirachacream
  5. I suggest using the sauce in small increments because it can clear your nostrils. I halved the recipe and still had leftovers.
  6. Add the sauce to a bottle and store in your fridge for later use and to create uniform plating.
  7. Keep eyes on your marinade because it can begin to burn easily on the stove.
  8. I suggest using Coho salmon because it contains the most nutritional benefits.
  9. When cooking your salmon, put a sheet of aluminum foil on the bottom of the pan. The excess sauce can cook into the pan and make it harder to clean.

Sweet, spicy and savory the dish hits all the high notes of a tasteful meal. High in omega-3 and full of flavorful notes, you’ll learn to love salmon as much as I do. It can be a versatile sauce for pork and other seafood. Experiment with the “spieety”–sweet and spicy–tastes of this meal.

Leave a comment with your favorite fish recipes. Follow my Pinterest for more recipes. Check back again next Wednesday for more tips and tricks from The Cooking Bug.