Tahini

tahini2

I never thought about the ingredients of tahini. It was not until I tried my hand at making hummus that I took a greater look into the ingredients. Surprise, surprise to find the main ingredients listed: sesame seeds, salt and oil–a lot simpler than I had realized. In a few short minutes, I created an ingredient to add flavor to my favorite Middle Eastern dishes.

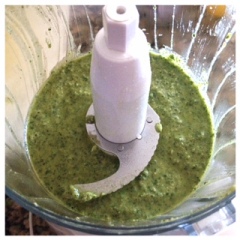
Tahini is ground sesame seed paste, similar to peanut butter. It is a creamy, oily and smooth nut butter rich in calcium. Tahini is an important ingredient in Middle Eastern cuisine and recipes such as hummus, baba ghanoush, halva and vegan or goddess dressing. Plain, unprocessed sesame paste with no added ingredients, like the one mentioned here, is known as “raw” tahini. Like many nut butters, tahini is a great source of omega-3 fatty acids, calcium and protein. It supports higher levels of fiber than ordinary peanut butter and lower levels of sugar that compliment many nutritional diets.

Here are some tips to keep in mind:

  1. Use unsalted sunflower seeds. Unsalted seeds allow for you to add salt based on your taste buds.
  2. Roasting the seeds brings forth the nutty flavors that can be hidden.
  3. You can toast them in the oven or stovetop. They take no more than 10 minutes; keep your eyes peeled because they can burn easily.
  4. I used olive oil; blending with olive oil creates an adhesion of creaminess between
    the seeds.
  5. Making your own tahini keeps those pesky preservatives from surfacing into your diet.
  6. Because of tahini’s high oil content, I recommend refrigeration to prevent spoilage.

tahini
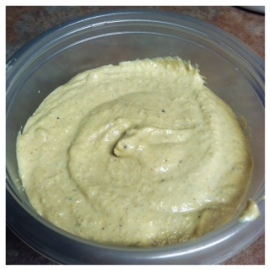
Tahini possesses the ability to transform many ordinary dishes into extraordinary meals. It works for dressings; it works for dips; it works for flavor. The nutritional information of homemade tahini is leaps and bounds above store bought fakers. Who knew simple ingredients and a simple process could make such a flavorful additive to my Middle Eastern cuisines? I do, and now, you do too!

Leave a comment with your nutty, tahini recipes. Follow my Pinterest for more recipes. Check back again next Wednesday for more tips and tricks from The Cooking Bug.

Grilled Halibut with Orange Salsa

grilledhalibutw:orangesalsa

Craving a healthy taco night? Try this grilled halibut w/orange salsa.  It’s simple to make and full of flavor.  From the Jillian Michael’s Master Your Metabolism, you’ll have a quick, easy, delicious and healthy meal.

Fish is a great source of protein and healthy omega-3 fats that we so desperately need.  Jillian notes that we should have a type of fish almost daily.  Fish provides a low calorie meal, healthy fats, and a fresh taste.  The thing to love most about this recipe is that you can curve those
taco cravings.

For 300 calories you can make four delicious servings.  Mix 1 tbsp olive oil, 1 tbsp chili powder, 1 tsp lime juice, salt, pepper, and 4 halibut fillets (6ozeach).  Grill them.  Meanwhile mix 2 oranges, 2 limes, cilantro, garlic, 1 tsp rice vinegar, salt, pepper, 1 Serrano chile, and 1 tbsp olive oil.  Add the two together and place on top of corn tortillas.

Here are some helpful tips to keep in mind:

  1. Mix the fish in the Ziploc bag well to make sure the spices get equally incorporated among the fillets.  If you don’t use a bag you can brush the seasonings on liberally.
  2. I cooked the halibut stovetop for around 10-15 minutes instead of grilling it.  I find fish hard to grill because it begins to fall apart.
  3. When making the salsa be ready for your hands to get juicy.  Try to save as much of that juice as possible by scooping it into the bowl you mix the salsa in.
  4. Since limes have such a hard skin, I just used their juice in the mixture rather than cutting them up.
  5. I nixed the cilantro because I am not a fan, but it will add a fresher taste to the dish.
  6. Cut the Serrano peppers into small, tiny, minced pieces.  You don’t want any large chunks in a bite.
  7. Let the salsa stand alone for about 5-10 minutes, mixing every once in a while to allow the flavors to absorb.
  8. I cooked the fish and salsa the night before, mixing them together and setting them in the fridge.  This step kept them cool and let the flavors really sink in.

grilledhalibutw:orangesalsa2

Remember that fish is only good for about a day after cooking, so don’t make too much too quickly or it will go bad.  Buy the fish the day of cooking so that it is the freshest piece.  Fresh fish will have the skin that will need to be removed after cooking; however, you can find frozen halibut without skin.  Just remember that fresher is better.  In a few minutes you have a tasty, healthy taco that will fill your stomach and keep you on track.  It’s fresh and light but filling to the bone.

Leave a comment with your fishy thoughts.  Check out my Pinterest.  Be sure to come back next Wednesday for more tips and tricks from The
Cooking Bug.

Sushi Trifle

sushitriffle

Deconstructed sushi! I love enjoying sushi at restaurants; however, rolling sushi can be time consuming and takes technique. The sushi trifle satisfies taste without the inconvenience of rolling. It can be plated to impress or mixed for ultimate enjoyment. Mix and match various flavors and ingredients to match sushi at
famous restaurants.

Sushi is a $14 billion industry in Japan. There are types of sushi to fit every taste–vegetables, raw fish, cooked fish and meat are common ingredients. The original type of sushi, known today as nare-zushi, was first made in Southeast Asia, possibly along what is now known as the Mekong River. The term sushi comes from an archaic grammatical form no longer used in other contexts. Literally, sushi means “sour-tasting”, a reflection of its historic fermented roots. The oldest form of sushi in Japan, narezushi, still very closely resembles this process, wherein fish is fermented via being wrapped in soured fermenting rice. The fish proteins break down via fermentation into their constituent amino acids. The fermenting rice and fish results in a sour taste and one of the five basic tastes, called umami in Japanese.

Here are some tips to keep in mind:

  1. I replaced the sushi rice with white rice. Brown and sticky rice work as replacements.
  2. The crumbled nori provides the full sushi roll flavor. It is salty and tastes best when slightly softened.
  3. I nixed the wasabi sauce because I prefer my food non-spicy.
  4. You can stack the ingredients in any fashion. For formal meals and fancy plating, use a clear wine glass and stack the ingredients in layers as seen.
  5. In the future, I suggest mixing the ingredients in a bowl to have all the flavors in
    each bite.
  6. Be sure to cook the salmon unless the sushi deconstruction is calling for raw meat. Be advised as to meats that can be eaten raw and those that need to be cooked.

Sushi has a long history throughout Asia. Methods have changed and contemporized allowing for variety and maximum flavor. While tackling sushi rolls may be challenging, sushi trifles complete flavor and ease. Mix and match favorite sushi rolls to triumph.

Leave a comment with your favorite Asian dishes. Follow my Pinterest. Check back again next Wednesday for more tips and tricks from The Cooking Bug.

Pesto and Halibut

pestoshrimpcaulipizza

As we all know, fish is a great source of omega-3 fatty acids.  But, fish can be, well, fishy with its bland flavor and slimy coating.  However, cooked properly and seasoned gracefully fish can be quite tasty and satisfying to your taste buds.  Halibut fits into these categories.

The pesto that I created was so delicious that it couldn’t be too nutritious.  Yet, when using fresh ingredients with no added preservatives and in moderation, anything can be healthy.  The pesto adds a nice flavor that tames the fishiness of the Halibut.  It can be used as a topping to any fish of your choice, tossed in with sautéed vegetables, added with spaghetti squash or with another dish of your imagination.

What you’ll need:

2 cups basil;   3 garlic cloves;   ½ cup walnut pieces;   ½ cup grated Pecorino-Romano cheese;   1 tsp lemon juice;   salt & pepper;   ¾ cup olive oil

Here are some helpful tips to keep in mind:

  1. I chopped my basil so that it would be easier to blend, but you can keep yours whole.
  2. You can use walnuts or pine nuts in a 1-to-1 ratio for your pesto.  I think walnuts give it a softer taste than pine nuts which are a bit more robust ground up.
  3. Add everything to the food processor except the olive oil.  Adding the olive oil separate allows for it to incorporate the ingredients evenly.pestoshrimpcaulipizza2
    4.  Add the olive oil slowly while the ingredients are blending.  Again, this process allows for an even incorporation of ingredients.
    5.  Blend for 30 seconds after adding the olive oil making sure to scrape the sides to create a more pastier pesto.
    6.  You can use Manchego or another type of cheese in replacement to the Parmesan.

If you are a pesto lover like myself, you’ll have no problem taking nibbles to make sure your seasoning is perfect before topping your food.  Remember, since pesto has so much olive oil that you will need to mix it before using it each time or the ingredients will separate.  Also, keep in mind that a little goes a long way so use the pesto sparingly.  Now, all that you have to do is top your fish or main dish with a tablespoon of pesto and enjoy.

Leave a comment with your pesto pairings.  Follow my Pinterest for more delicious recipes.  Check back again next Wednesday for more tips and tricks from The Cooking Bug.