Honey-Lime Grilled Chicken

Are you tired of the same old chicken?  Eating it day in and day out can be gruesome.  There are only some many ways to make it, right? WRONG!  This honey-lime grilled chicken gives a new meaning to chicken.  So long to those bland flavors, and hello to the new, healthy chicken.

Chicken is a great source of protein that I eat often.  I’ve gotten bored of the same methods of oven-roasted chicken.  There are only so many sauces to cover it up.  The marinade here gives the chicken a quite different flavor profile that masks the chicken well.  Keep in mind that since it is marinated that it will need time to sit in the refrigerator before cooking to enhance all
the flavors.

Here are some helpful tips to keep in mind.

  1. You can use fresh limes and juice them, but you would be going through quite a bit of limes.  We used the bottled lime juice about one bottle should do.
  2.  The thyme and rosemary can be added in by the stems so that they can easily be picked out.  You wouldn’t want to chop on one of them because they are hard
    and strong.
  3. You can chop the amount of oil in half for a healthier amount and just spray top of the grill with cooking oil.
  4. Make sure they have a nice charcoal on them to add crispiness to the chicken.

Dig in and enjoy another chicken with extreme flavor.  This recipe won’t leave you hanging on the same bland chicken.  It has an interesting flavor that makes it unusual but delicious.  Pair it with some grilled sweet corn and roasted carrots for a delicious and healthy dish that will satisfy your rumbling tummy.

Leave a comment below and follow my Pinterest for other chicken recipes.  Check back next Wednesday for another flavor profile from The Cooking Bug.

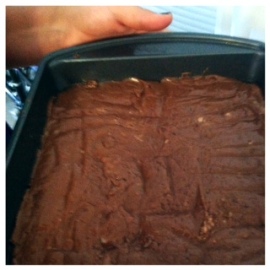
Nutella Fudge

Nutellafudge2

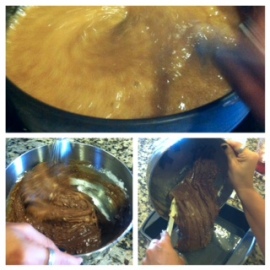
Fudge is always tricky to make.  It can take quite a bit of time and the right temperature to make the consistency just perfect.  So, note to not get snippy with your mother if you have trouble in the process.  Like shortbread, it can be too hot, too cold, too humid, or any other too you can think of.

However, I didn’t think the nutella fudge was hard to complete for a tasty dessert.  The hardest part about this recipe is trying to keep from eating it while you’re cooking!

Here are some helpful tips to keep in mind:

  1. Have all your ingredients out and measured so you don’t waste time trying to multitask.  Fudge is one thing that you need to keep constantly moving.
  2. Use the salted butter.  Salt makes food taste more flavorful.
  3. I chose to use half and half.  It comes in a smaller container so you aren’t wasting ingredients after the fact.  It also is cheaper at the stores.
  4. I only needed 2½ cups confections sugar (aka powdered sugar).  Too much sugar and you’ll have the fudge too thick.
  5. I didn’t use the vanilla.  While it will round out the flavors more, the fudge was already sweet enough and draws out the Nutella flavoring more.
  6. Let it sit unsettled for at least 2 hours in the fridge taunting you with its deliciousness.Nutellafudge

Now, you have the tips, the recipe and the guts to go out and try this recipe.  Wow your friends and family by making these delicious bites.  I cut out 35 squares so that everyone could get just enough fudge to tickle their taste buds.  There are a bunch of different flavor combinations that you can try from white chocolate, mint chocolate, and peanut butter.  Be sure to know that I’ll be trying
them all!

Leave a comment below with your fudge ideas.  Follow my Pinterest for more recipes.  Check back again next Wednesday for more tips from The Cooking Bug.

Coconut Souffle

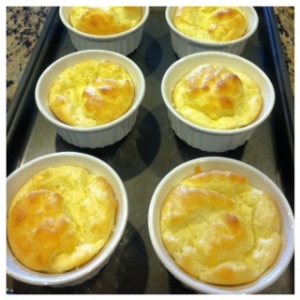
coconutsouffle2Soufflés are temperamental and extremely difficult in their own way.  Theoutcome is all in the egg whites.  They have to be whipped to perfection in order to master the soufflé.  Eggs are the key ingredient for the lightness and airiness of a soufflé.  Improperly beaten egg whites (both under- and over-beaten) aren’t aerated adequately, and as a result, the final product is dense, flat, and a disappointment.  However, the taste is still there, so don’t be too dishearten by this coconut soufflé.
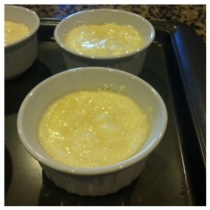
Many times, making a soufflé takes many attempts to gain perfection.  Keep in mind that the fresher the eggs the better they are at being whipped; keep the egg whites and yellows as separate as possible; keep beating until you have stiff, shiny peaks.  Increase the speed of the beaters slowly.  Signs that you have overbeaten your eggs are a dry and curdled look with liquid weeping from the sides.  While the eggs can still be used, they will affect the overall look of your soufflé making it denser.

Some other tips to keep in mind:

  1. I would add the coconut extract to the batter to keep it from making your dry ingredients stick in clumps.
  2. I would add more of the coconut extract than required for a more coconut flavor.
  3. I used Stevia; however, its light texture does not work well in this recipe and it has a diet aftertaste.  You’re already breaking the calorie count with this recipe so go for the real stuff.  If you are concerned, use ½ the amount of sugar with Truvia.  Truvia is sweeter and zero calorie than regular sugar.coconutsouffle
  4. The third rack in the oven is important.  It allows the tops to puff and brown along with the dessert to be cook all the way through.
  5. When mixing in the egg whites to the batter, do so gently.  Again you don’t want to overbeat your egg whites and mush them into nothing.
  6. You can toast coconut in the oven to dust on top of the finished soufflé.
  7. I would suggest adding whipped topping to give the dessert a yummy creaminess.
  8. You can use other sized ramekins, just remember to adjust the cooking times.  I used 7oz ramekins and it took about 20 minutes to cook thoroughly.
  9. The soufflés are finished when you have a puffed top and golden crust.

Challenge yourself with making a soufflé of your own.  There are many types of flavors that can be added to please any taste buds.  Remember that white soufflés are not as sweet as darker, chocolate soufflés.  Check back soon to hear about my chocolate soufflé tips for those once a month cravings.

Leave a comment below with how your egg whites work.  Be sure to follow my Pinterest.  Check back again next Wednesday for more tips from the cooking bug.

Cauliflower Pizza

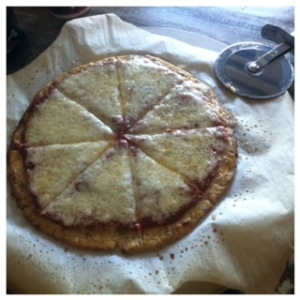
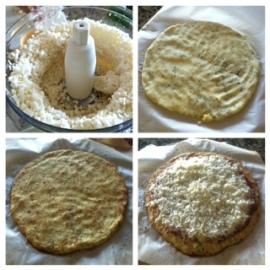
cauliflowerpizza2

When it comes to pizza, cauliflower is the last thing from my mind.  I picture a large pepper, onion and pepperoni pizza oozing of cheese and a crisp, chewy, garlic bread crust.  However, once you go cauliflower you’ll never go back.  A few weeks back, I tried cauliflower as a substitution to tortillas.  This cheesy, cauliflower pizza seems to follow in those steps.

While it can’t replace your greasy, heart attack pizza, it can provide a healthier meal and delicious flavors.  Keep in mind that like many dishes with cauliflower, it can have a more grainy texture that might take some getting used to.  With a layer of sauce and a sprinkle of cheese, you can extinguish your pizza fix in a healthier setting.

Here are some tips to keep in mind:

  1. Remember that ricing the cauliflower means using as little of the stems as possible and making it in a more moldable form.  Be sure to wipe down the sides a few times during this process.
  2. Once riced, microwave it in order to get more of the liquid strained from the cauliflower.
  3. I used a paper towel and drained the liquid in batches.  Let the cauliflower cool before handling or your hands will get burned.
  4. I sprayed the parchment paper with Pam instead of olive oil to cut the calories and make it healthier.
  5. Using a pizza stone works best because it will not burn as easily, but a cookie sheet works just as well.
  6. Use your hand to pat out the crust and make sure that it is evenly spread around in the shape you want.  It should be easily moldable like Moonsand but not goopy like putty.cauliflowerpizza
  7. I cooked the crust for 15-20 minutes adding more time for a crispier center.
  8. We used a Boboli sauce because it has a sweetness to it, and NO other sauce can
    beat it.
  9. I used a mixture of 3 types of cheese on top: Manchego, Gruyere and Fontina. They compliment each other very well and are mild yet tasty.  We used 2 oz of each, but I recommend next time using 1 oz.
  10. Because we are using so many cheeses there was a thin layer of grease.  If you don’t want the grease, just dab it lightly with a napkin.
  11. I recommend not using peppers and tomatoes because these vegetables release water in the cooking process making the
    crust soggy.
I split the pizza into 8 slices raining in about 230 calories per slice.  With that count and a veggie bottom, I am in heaven.  Now you can enjoy a healthier, tasty version of pizza.  The recipe allows for gluten free, Paleo (using their own toppings) and vegetarians to dig in and enjoy.  This pizza recipe allows for me to indulge in my pizza cravings without killing my calories.  One piece of a regular pizza ranges 300-400 calories while this one kicks that in half.
Leave a comment with your thoughts on cauliflower.  Be sure to follow my Pinterest.  Check back next Wednesday for more treats and tips from The Cooking Bug.