
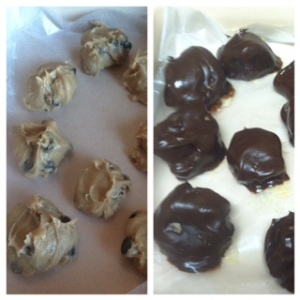
Now I know you all enjoyed the Nutella fudge that we had previously tried and I promised that I’d be experimenting with different variations. You might be wondering what could be better than Nutella and while that question may be hard to answer I can say that peanut butter comes pretty darn close. Yup, we’re making peanut butter fudge.
Fudge can be kind of tricky and temperamental. Weather and humidity can all effect the cooking process differently. My Grandma is usually the one to send us peanut butter fudge around the holidays and it is something to look forward to. Peanut butter, sugar and sweets are world-dominating combinations. So, without further torture I’ll get down to business.
Here are some helpful tips to keep in mind:
- Like making any kind of fudge, have your ingredients ready to go and already measured so all you have to do is pour. This method helps keep the steps of making fudge less messy and quicker.
- Melt the butter while you’re measuring because it’ll take a little bit. If you are unsure about your speed, melt the butter on low.
- Make sure your stovetop mixture is at a rolling hard boil before you remove it from the heat. You’ll notice bubbles around the edges and starting in the middle.
- Be sure to constantly keep mixing everything to incorporate it and make sure nothing burns.
- I replaced the Nutella aspect with peanut butter in a 1-to-1 ratio. Make sure to use a thick peanut butter, no nut butters because they separate oils too easily.
- I used about 1/4 less powdered sugar so that it isn’t too sweet. You can always add more powdered sugar to give the fudge form.
This fudge is creamy and delicious. I have to say it is number 1 on the list of things I have made thus far. It trumps any fudge that I have tried, sorry Gram, and I plan on making more in the future. I made half of the recipe which is the perfect amount. There is some to share without you digging in and pigging out–trust me it’s hard.
If you want to go really crazy, you can do half Nutella and half peanut butter fudge for that chocolate, peanut butter craving. Impress your friends and co-workers with this recipe and send it out for holiday treats. It’s quick, easy, and tasty: the best kind of sweet.
Leave a comment on your fudge ideas. Check out my Pinterest. Be back next Wednesday for more helpful tips from The Cooking Bug.

 The “American truffle” is a half-egg shaped chocolate-coated truffle, a mixture of dark or milk chocolates with butterfat and, in some cases, hardened coconut oil. The “European truffle” is made with syrup and a base made up of cocoa powder, milk powder, fats, and other such ingredients to create an oil-in-water type emulsion. The “French truffle” is made with fresh cream and chocolate and then rolled into cocoa or nut powder. The “Belgian truffle” or praline is made with dark or milk chocolate filled with ganache, buttercream or nut pastes. The “Swiss truffle” is made by combining melted chocolate into a boiling mixture of dairy cream and butter, which is poured into molds to set before sprinkling with cocoa powder. As you can see there are many ways to make a truffle, but this recipe simplifies and hits the nail on the head: a win-win.